Experiencing beauty in your creative life

Tuesday, April 10, 2012

Lovable Links Edition 2

Happy Tuesday friends!  Just wanted to share a few fun ideas I found on the Internet this week.  Starting out with these super cute "vintage inspired favors and gift wrap" from Kelly at  Live.laugh.love

I am definitely going to try this project!


Along similar lines I fell in love with these beautiful utensil holders.   Lace and burlap...who could ask for more?  Thank you Ruffled Blog !
victorian-wedding-ideas66


Next I found these shabby chic little houses at Stampington & Co.  This is a great blog with lots of tutorials and wonderful stamping projects.  This project by Kristen Robertson is called "Where My Heart Lives".


Finally I pinned these cute crochet eggs on my Yarn pinboard this week.  It's a little late for Easter, but I think they would be darling in a nest, for a spring decoration. Hmmmm, future post?  You will just have to wait and see.  For now you can visit
Easy Makes Me Happy for the free pattern.


I hope you enjoy these links and find them useful be sure to let me know if you make any of the projects.  Did you discover any new projects this week?

Enjoy the rest of your week,
j

Wednesday, April 4, 2012

Do you do belly bands?


Hi everyone! Instead of making the same old tags for Easter treats this year I decided to make belly bands. I started with some chocolate covered peeps and simply wrapped a strip of paper around the middle of the package. Then just decorate as you would a card or tag. Fun, easy and something a little different.


I used my computer to generate the text in a circle and then stamped the chick from Rubber Stampede .  I used the Tim Holtz mini rosette die with yellow cardstock and embellished with a ribbon and a flower.  


I have used belly bands before on books and frames, but this is my first try at treats and I think I like it! Do you have a clever use for a belly band?  I would love to hear it!

Hope your weekend is filled with spring fun!
jamie

Sunday, April 1, 2012

"I'm in love, i'm in love and I don't care who knows it!" Buddy the Elf

I know, I know!  You have heard me say this a million times, about paper, fabric, rubber stamps and anything that has caught my eye on a particular day.  But today's object of adoration is simply to wonderful not to share.

Sooooo...here she is!


Is she not the most beautiful thing ever?  She is a replica of a vintage Santos.  Which really  meant nothing to me until I brought her home yesterday.  After her photo shoot I let her take a little break and I did some research.  It is always so cool to me when you find something you love and low and behold you loved it before you even knew it existed.  Which is the case here.

Although I am not particularly religious (not at all really) I have always love religious artifacts and art work.  Mostly of the Spanish variety.  Every time we visit my son in Tyler, there is store there that I am so intrigued with, I will go in one day even if Bo just waits in the car.  They sell Mexican religious artifacts, shoes, and work boots.  Odd?  Kinda. Cool?  Oh Yeah!  Anyway when I was drawn to this little beauty I had no idea that she was a replica of Spanish religious artifacts.  Which proves you are never to old to learn something new!  If you would like to read more about Santos, there is a great definition on Wikipedia .


What kind of art are you drawn to?  I would love to hear, who knows maybe I will find something else to love.

Have a great week!
jamie

Thursday, March 29, 2012

Lovable Links

Hi everyone!  As most of you know I LOVE to read blogs.  I subscribe to blogs about stamping, crafting, sewing, crochet, home improvements, decorating and fashion.   I could go on and on, but I will spare you the long list.  Anyway, sometimes I want to share the little goodies I find, and I thought what better way than a weekly blog post of my favorites.  Thus, "Lovable Links".

I found this sweet little fairy project at Embellishing Life .


My boys are kind of big for this one, but i really love it!  Dogs maybe?  Hmmmmm.


Next I have a quick idea that I know will come in handy at our house.  I don't know about you, but I break that clean refrigerator door design rule, my refrigerator is covered with cards and photos from family and friends.   So I am always on the look out for cute magnets to use.  This post at The Cottage Market shows you how to make button magnets.


Do you have any favorite spring idea link?  I would love to post them here!

Have a great day!
jamie

Saturday, March 24, 2012

It is always black and white with me....

Well, maybe some brown too. I just love using black and white color pallets with card projects. This little photo is a clipping from an ad in a stamping magazine that was begging to be cut out and used on a card.
 

I'm not sure the look on the dog's face says thanks, but I couldn't resist making a thank you card out of this.  After all, look at how carefully his master is brushing. 

In other news I am hoping that a recent birthday gift improves the quality of the photos on the Bee blog.  This little baby came in the mail on Friday! 
  Nikon 1 J1 10.1 MP HD Digital Camera System
Thanks Bodine!  Yes I know the color is kind of boring, but I am trying to keep my "focus" on learning to take better photos.  Are you trying to learn anything new?  I would love to hear about it!

Enjoy the weekend!
jamie

Wednesday, March 14, 2012

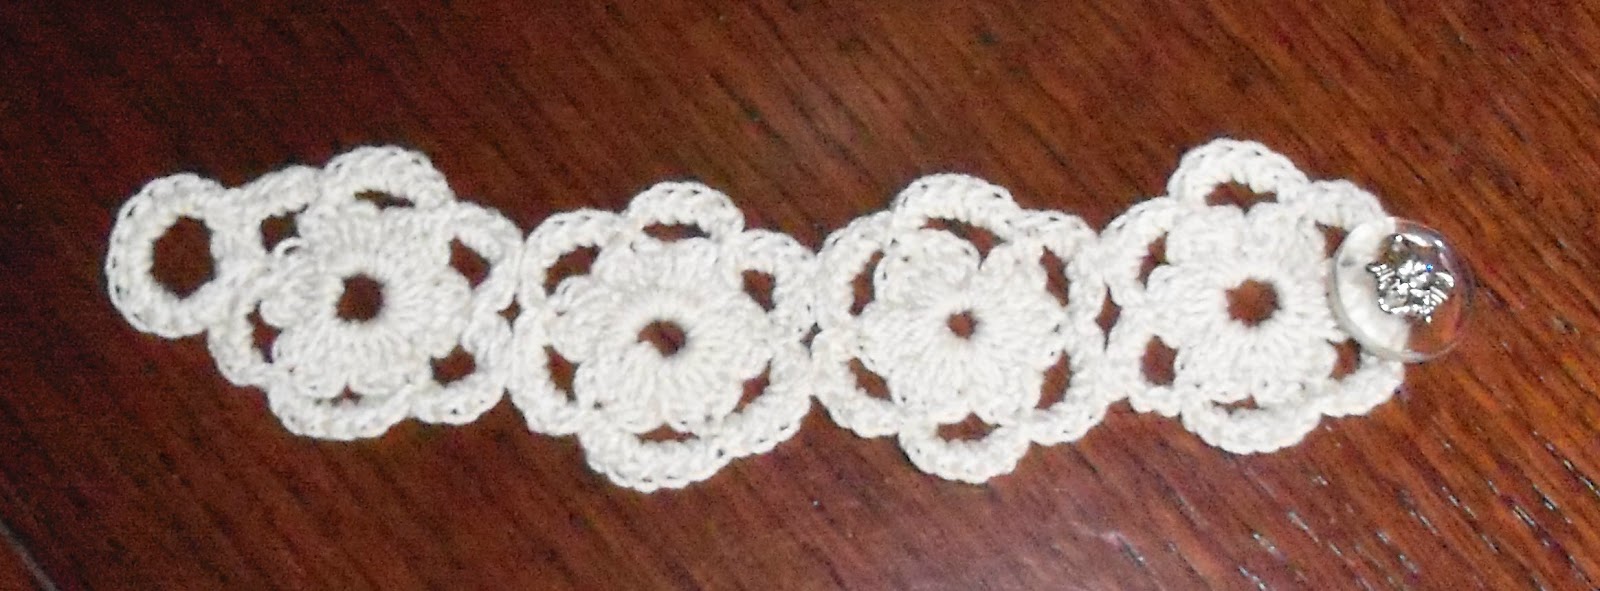
Crochet bracelet pattern

Hey everyone!  I had so many lovely comments on the card and bracelet set.  Thank you all so much.  I also had several requests for the pattern, It is super basic so give it try. (That means you "N")

Flower Bracelet


Supplies I used:
Crochet hook 2.25
Egyptian cotton crochet thread
Tapestry needle
Button

Stitches I used:
Ch - Chain
Slip Stich
Sc - single crochet
dbl - double crochet


Individual flower (make 4):
Chain 6 and  slip stitch to the 1st chain.

Round 1: *Chain 2, then 2 dbl inside the ring, chain 3and slip stitch inside the ring* repeat from * to * 5 times.  You will have six petals.

Round 2: Slip stitch on each of the first three stitches of the first petal. (this will move your thread to the top of the first petal)  Now do 1 sc in the next stitch.  Chain 5.  *Do 1 sc in the top stitch of the next petal and chain 5*  repeat from the * to*  all the way around the flower and slip stitch to the first sc.

Round 3:  *Crochet 6 single crochet on the chain line.  Slip stitch on the top of the petal.*  Repeat from * to * until the end and then slip stitch to the beginning.  Tie off  leaving a long trail of thread to sew the flowers together.

Fourth Flower Only - Round 4: Slip stitch on each stitch until you reach a valley between the two of the scallops.  Chain as many as you need to accommodate the size of the button you have chosen for your bracelet.  Join with a slip stitch.  I secured a few stitches on each side to the scallop using a tapestry needle and trail of thread left at the end,  just to make it more sturdy.

Completing the project: Using the tapestry needle and trail ends of thread, sew the flowers together. You can do it any way you like. I chose to connect the flowers at the top of two scallops.

It looks like the original is fastened a little different.  You can see a photo of it here.
After the flowers are all together add you button and enjoy!

Let me know if you have any questions.  I am soooo not a professional at pattern writing. If you make this, please send me a photo.  I would love to see it and post it here.

Looking for more crochet patterns?  I love the patterns at Attic 24.  Her happy flower is definately on my to do list.

Hope the rest of your week is wonderful!

Jamie

Saturday, March 10, 2012

Back to Blogging!

Thanks to a sweet friend and fellow artist's support and encouragement,  I have decided to come back to my blog.  I have missed  sharing ideas, projects and stories with you all.  I am thrilled to get going again.  So without any further delay, here is the first project of 2012!  

I thought the perfect way to get back into the swing of things would be to make something for the friend that is responsible for my return.  I decide to use two of my favorite art forms - crochet and cards.
  
This sweet little flower bracelet was inspired by a pattern by Lia Govers,  Free Flower Bracelet Pattern, I made the following modifications to make it the size I wanted.
* I used six chain stitches to form the initial round (instead of 8) and for round one I used a double crochet to form the petals (instead of a triple crochet).  If you are interested in the exact pattern I used you can email me and I will send it to you. 


My friend is crazy about buttons, so I found a great Tim Holtz button to use for the clasp.

It is always important to me that a gift be presented in a special way.  So I made a card in a size that would accommodate the bracelet nicely.

I just cannot get enough of this dress form die, from Sizzix and Tim Holtz.  It is so much fun.
Inside I tied a simple bow to hold the bracelet in place.

I don't want to ruin the surprise, but I do hope she is reading this...Thanks E!

Enjoy your weekend everyone!
Jamie