Experiencing beauty in your creative life

Sunday, January 27, 2013

Here a pin, there a pin...

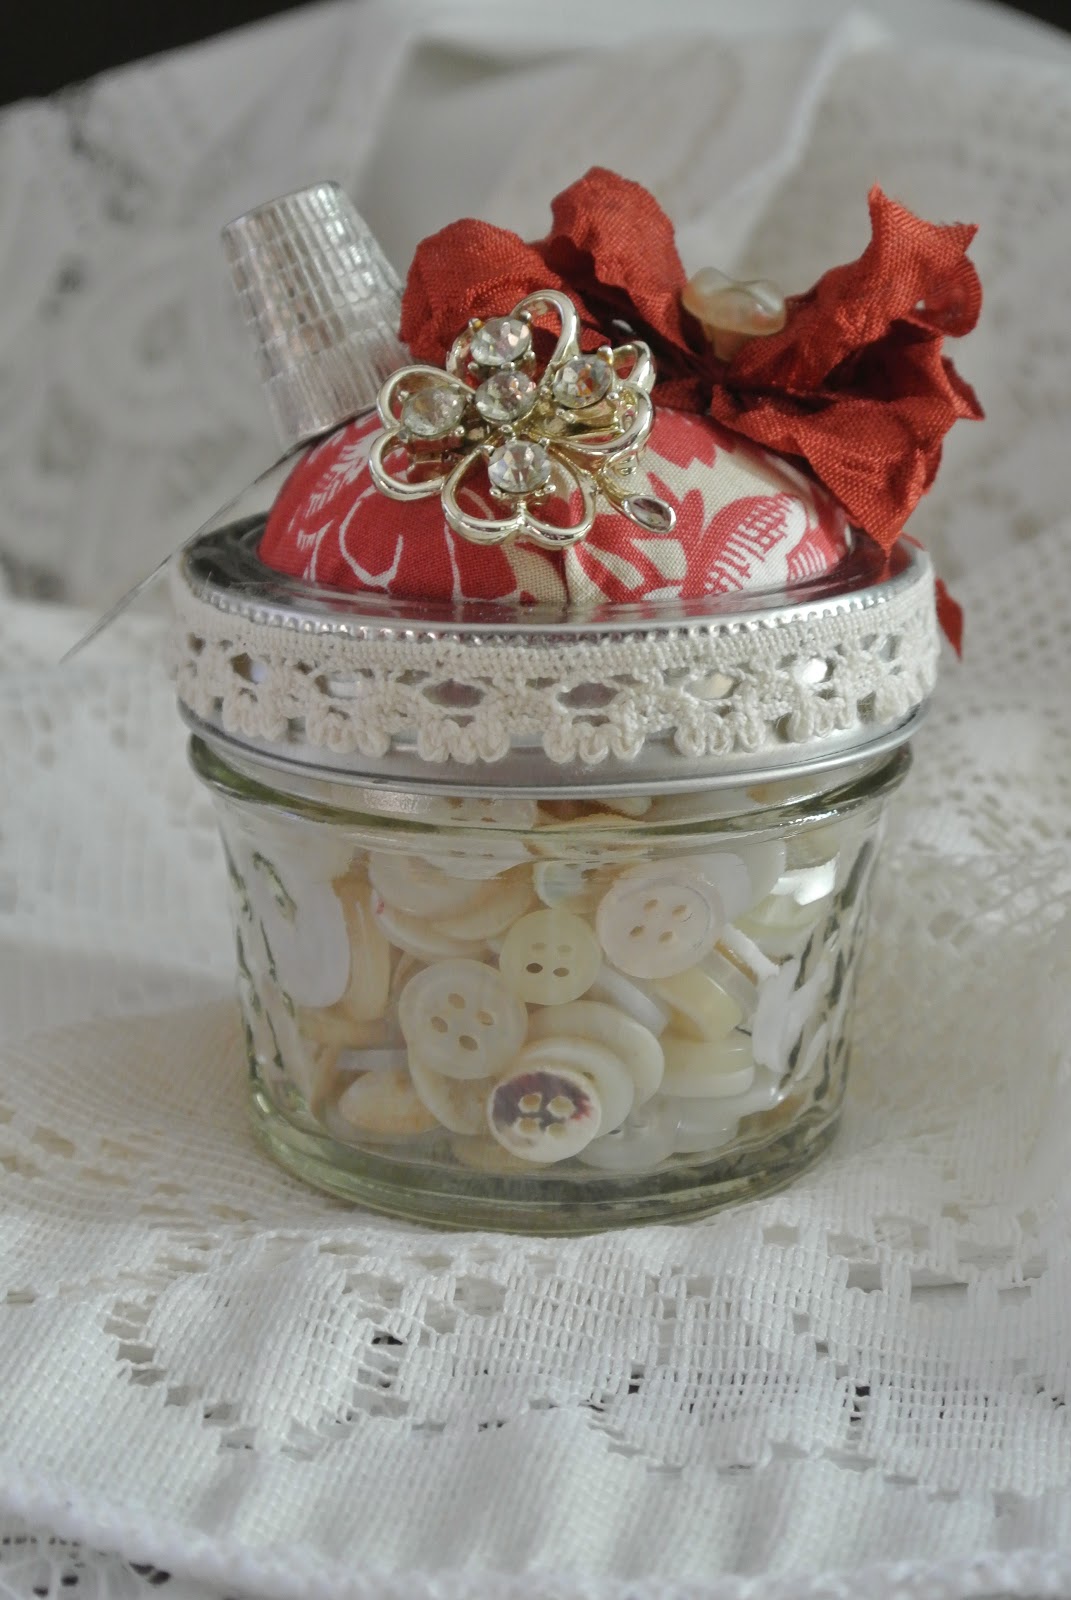
EVERYWHERE a pin cushion.  More pin cushions today.  Up first today is a little felted birdy on a traditional flower shaped cushion.  A while back I posted a felted pumpkin and the link to purchase the kit I used to create it.  I took that lesson, and some wool roving from Hobby Lobby and made this little robin.  I think it dressed up this basic pin cushion well.  Also added a few Tim Holtz vintage look safety pins an it seemed complete.  The circular pin could actually hold a gift card, place card, or any kind of greeting, but for now I like it empty.

 
Another little pin cushion that I put together using the same basic cushion pattern is this pink fleece felt piece.  This went together in a snap with two dies from Die-namics.  The rolled rose and small hearts.  A few CTMH stick pins and I was in love! (again)
 
 
Finally today I want to share a project that I did almost a year ago, but haven't gotten around to posting. It includes a little cushion, but also uses my old standard scrapbooking papers and embellishments.
 
 
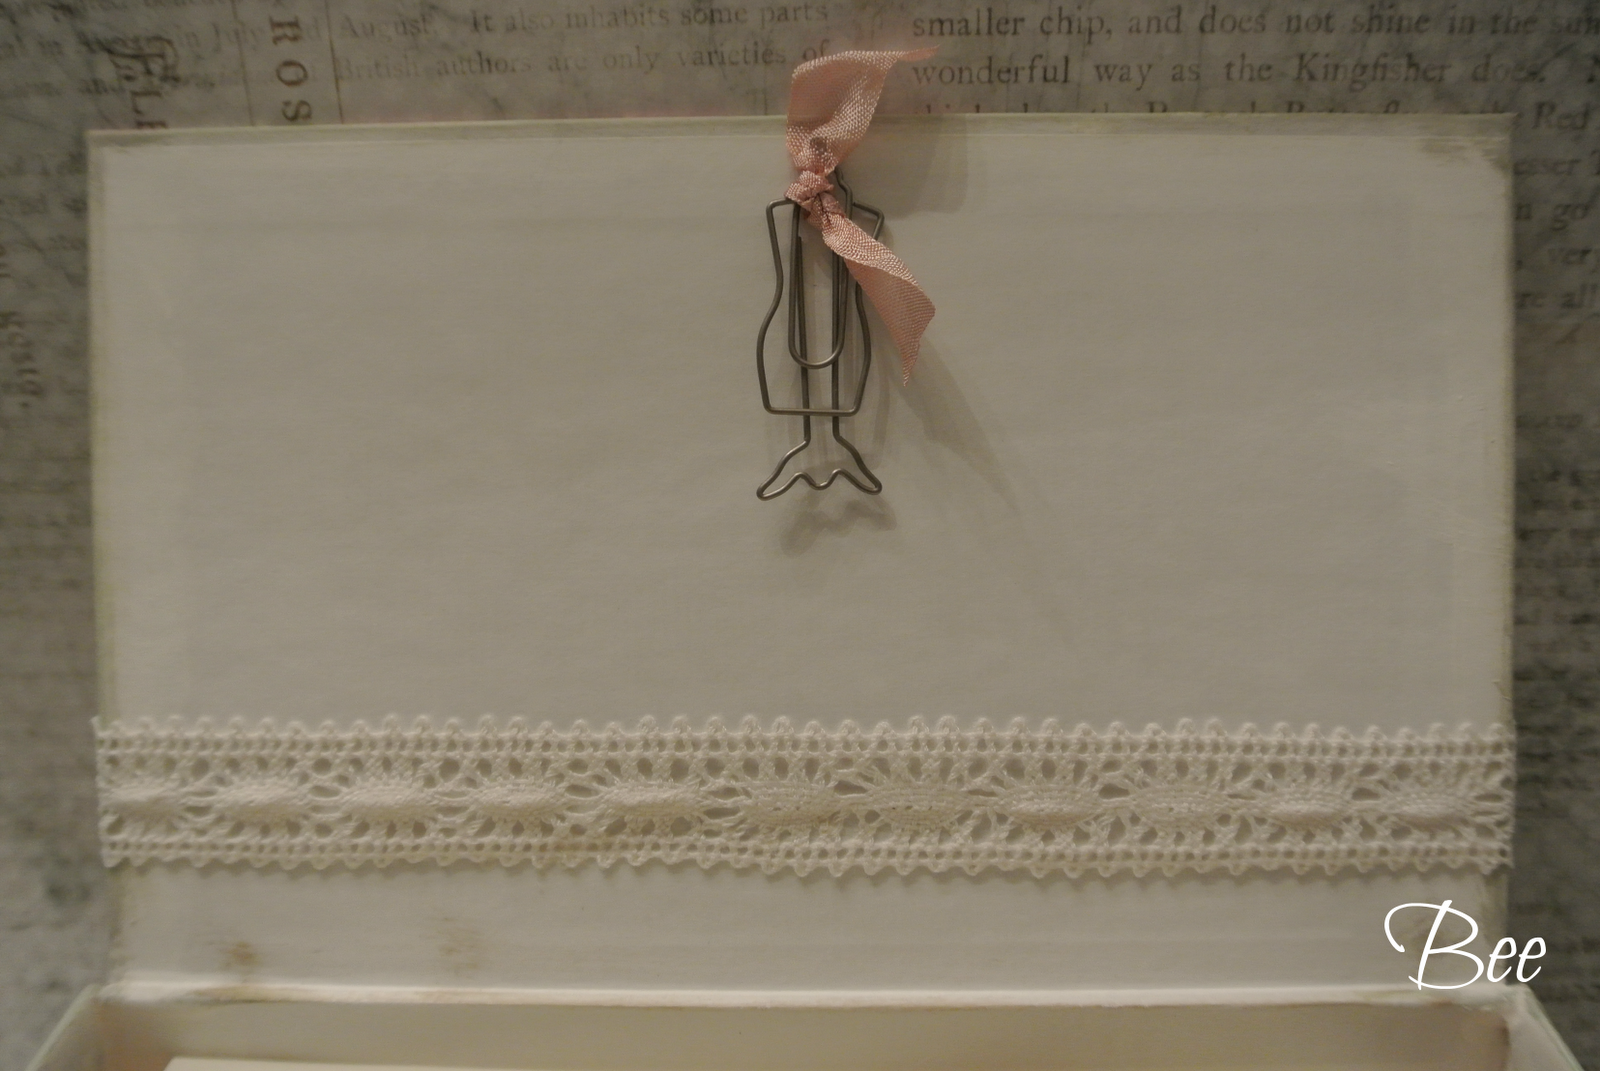
I started with a plain white box with a hinged lid.  Cut paper to fit just inside the top bottom and sides.
 
 
 Added a little paper to the inside and created a little envelope with burlap paper.
 
 
The super easy square cushion fit down into the center.  A button is holding the ribbon that will tie the gift card into the box.


 I felt much better about giving a kind of impersonal gift card when I was able to present it in this little box. 
 
Are you on project overload?  I will try to slow things down, maybe not three projects at once next time.  I'm just so happy to be back to blogging that I can't share enough.
 
toodles,
jamie


Tuesday, January 22, 2013

Have you made anything good lately?

     That was the question a friend asked, when I bumped into her in December.  My answer was not really.  But when I got home I realized that I hadn't made anything with paper in awhile, but I had been feeding my pin cushion addiction with crochet and sewing.  Over the next few weeks I will be sharing them here at BEE.  Even if you don't have a practical use for a pin cushion, these fun designs make a perfect accessory to many rooms of the house.

The pin cushions pictured below is my first attempt.  This one recycled an old quilted toile pillow sham for fabric, an antique dog figurine, and a few beads added to pearl top corsage pins.  I will put together a tutorial for this style pin cushion as it has been my favorite to make so far, and you will see them in future posts, but for now it is simply two circles; sew around the perimeter, turn, stuff, close and embellish.  Easy peasy.
 
 
The next one is a crochet project.  I found it on Pintrest...of course!  The pattern can be found at Hooked on Needles .  I appreciate her giving us such a cute pattern to use. Check it out if you crochet.  It is easy and super fast.  The pins on this one are a little more difficult to see, but they are also pearl top corsage pins with small green flower beads under the pearl.
 
 
 Lastly, I want to share a no sew pin cushions.  Also found the idea and instructions on pintrest, but the assembly is pretty straight forward.  I took the disk portion of a canning jar lid and glued batting to the top.  Covered it with fabric and then slid the ring over the top.  I didn't use glue,  it fit pretty snug once I got it in place, but if you wanted to you could glue the disk into the ring.  A little leftover lace trim finished the lid out perfectly.   Next I added a few little treasures; vintage thimble, vintage rhinestone clover pin, and a crinkled seam binding bow.  It is kind of difficult to see, but there is a little needle threader hanging below the thimble.
 
 
Accessorizing these little creations is my favorite part. 
 
So, have you made anything good lately?  I look forward to hearing about it!
 
Toodles,
jamie
 
 
Linking up at...-Crafty, Scrappy, Happy Check it out they have some great projects.


Saturday, September 8, 2012

Fall Felting

It's feeling a little like fall here in North Texas!  That means a cool 84 degrees.  Ha ha!  Since it is starting to cool off a little I decided to take the opportunity to show you a little fall project I just finished this afternoon.  I pinned a cute little felted pumpkin a couple of months ago and titled it "I am totally learning to do this!".  And I did! I ordered this kit and started working on it last week.  It is a great kit for beginners, including everything you need to make the little pumpkin.  Instructions were super clear and easy to follow.   I was squealing with delight within a few minutes.  It was like making a felt sculpture.  

I started with this...

followed the directions and ended up with this...


I had so much fun I decided to try a jack-o-lantern.


Really it's more of a jill-o-lantern after I added the bow to the hat I decided she needed to be a girl.  Then the eyelashes were the next natural step.  She is sitting on a vintage spool painted black and distress.  My original intention was that she would be a little more primitive than cute, but as with most of my art projects, she kind of took on a life of her own once I had started.  I'm going to give the prim look another try so check back soon to see a few more pumpkins.

If you are interested in felting I encourage you to try this little kit.  It was really a fun way to try a new craft.

Toodles, 
jamie 

Monday, July 23, 2012

A Little Summer Stamping and Sewing

Hi!  I hope everyone had a wonderful weekend.  Today I want to share a project I made in May for some of my coworkers.


It is a pretty straight forward project.  The stamping was quick and easy...1.  Stamp the Papertrey Ink Button Boutique Stamp  on white cardstock.  2.  Stamp the "Thank you" in the center of the button card image.  The stuffed felt strawberry is a magnet, so in order to attach it to the card I glued a penny to a slightly larger piece of brown cardstock.  Then centered the white stamped piece on the brown mat.


I love sewing with felt.  I think it is much easier to sew seams on the outside of a project.  This strawberry is simply two red felt hearts, embellished with "v" shaped stitches for seeds.  The hearts are sewn together with a blanket stitch and stuffed with a little cotton batting.  The green leaf and red pieces used for the berry are all cut on my Big Shot using two different size hearts from the  Classic Heart Die Set from Nestabilities.  The sweet little flower is also a die, Die-namics mini rolled roses .  It is one of my most used dies, I think the  cute little flowers are a great finishing touch to any project. 

One more quick look at the finished project.


I was so proud to give this little gift as a token of my thanks.  I hope they liked it!

What have you been stamping this summer?
I would love to hear about it!

jamie


linking up at:

UndertheTableandDreaming


Sunday, July 8, 2012

It's been a little while since my last post...

But it has been CRAZY busy around the McCormick house.  First of all I have been thrilled to use all of my free summer vacation time to try out some projects from Jack's Pintrest boards.
I started with this great milk can project from 
his "Front Porch" board.

Pinned Image

It took quite a bit of hunting and a fair amount of haggling, but I was able to find a milk can locally.  I deserve a huge slap on the wrists for not getting a before picture, but if you close your eyes and picture a tomato red milk can with sunflowers measuring about 5" in diameter painted all around the sides, you have a good idea of where I started.  Oh, and I can't forget the white polka dots in puffy dimensional paint.  It was quite a site!

Now open your eyes and see my new black address milk can.

(Yikes - my photo looks so bad next to that one above.  I have to work on that!)

The project went pretty much as expected.  The original paint was pretty thick, so it needed some sanding before paint.  The paint used was Krylon high gloss black (2 cans).  Painting the address was a little more tricky, I tried to use stencils but didn't really get a good smooth image like I wanted.  I look everywhere for vinyl numbers but couldn't find white in a font that I liked.  Finally the numbers were ordered from Do it yourself lettering . The shipping was the same amount as the numbers, but it was worth it to me.  I really love the finished project.

Now for news on another big event around here...

IT'S A BOY!


We have a new baby around the house.  His name is Jim and he is keeping us really busy!  He bounces from one activity to another - bones, balls, tug of war, and eating anything he can fit in his mouth (as well as somethings he can't)  We are having fun, but when it's time for this we are all a little thankful.


Speaking of sleeping - he is snoring away right now so I think I am off to get a little lunch in peace.  Check back often to see more Jack's Pintrest projects come to life, and if you are interested I am linking up at a Pintrest linky party at


Have a great week,
jamie


Wednesday, June 13, 2012

A Box for a Baby

Hello everyone, thanks for stopping by to check in on today's project.  This little box started out as just a plain chipboard box - the old fashion school box kind - It is a super basic project, I measured the top, bottom and sides of the box and cut some pretty papers fit.  These are from Pink Paislee . 


A little garden green card stock from CTMH added nice detail to edges of the top.  The butterflies are cut from the scraps and then the bodies were glued to allow the wings to "flutter".  When the box is open you can see this little dress form paper clip. I so love this clip.  I attached it with a little bit of Glossy Accents . 


The card slips into the clip for pretty presentation.  A great way to give a thick card.


   Pearl beads seemed to give it the prefect little lift it needed.


I can't end this post without showing the precious little goodies that were given in this box.  As the mother of two boys I had the time of my life shopping for these...


I hope that you have enjoyed this little bit of girly stamping.  Do you have any ideas for covering gift boxes?  I would love to hear about them.

Until next time,
j


&

UNCOMMON

&

SABlink-party

&
Wildflowers and Whimsy

Saturday, June 9, 2012

How about a little stamping and paper project?

Looking back at recent posts I realized that I have been neglecting my favorite medium...paper and stamps!  So today I want to share a little paper project.  Believe it or not the bones of this little beauty are the components of an old ribbon spool.


Here it is in it's original from and deconstructed.

Be careful not to tear the main parts of the structure, the top layers of paper may tear, but that is okay.


A big shot die cut machine was used to cut the two disks from the spool into  big scalloped circles, then four pattern paper scallop circles were cut to make one for each side of each disk.  Papers shown are from French General .  (On a side note if you have never been to the French General web site I encourage you to go now, well, maybe right after you are done here.  It's so beautiful and the products unbelievable!  And even better yet...If you order something ~ you will feel like it is Christmas morning when it arrives.  They package everything so beautifully, it makes you feel very special.)  A strip of coordinating paper from the same package was cut to fit around the inside and outside of the body of the spool.


Then two more small scallop circles were cut from yet another coordinating paper (I'm telling you this paper is to die for!)  The smaller circle was attached to the inside of the lid with foam tape.  This simply helps keep the lid from sliding off the top.


In the shot above you can see that the ring has been glued to one of the scallop circles.  Two circles of fluffy felt were gently glued into the bottom of the box to keep treasures from rolling around and getting scratched.  The top of the box was decorated with a stamped banner, some crinkled ribbon and a prima flower .  Then all it needed was a beautiful gift to go inside.


Do you have a favorite home made way to give a gift?  I would love to hear about it, or better yet see it.  If you email me a photo, I would love to share it here.


Have a wonderful weekend!
jamie


linking up at
UndertheTableandDreaming