Experiencing beauty in your creative life

Thursday, May 24, 2012

Headband Holder - Covered in Muslin, of course!

In April a friend and I took a trip to First Monday Trade Days in Canton.  You may remember this post where I professed my love for the Santos statue I found that day.  On the list of treasures we hoped to find, was a headband holder for my friend's daughter.  We searched high and low but found nothing.  So I though I would try to make one for her and this is the end result.

It was a super quick and easy project.  This is a can from protein drink mix, but any can about this size will work.  Start out by tracing the lid and cutting out the circle, leaving a little extra to cover the edge.  Use a stencil or free hand a monogram.  The dots are just the end of a paint brush dipped in paint and dotted on the fabric.  Set that piece aside to dry. 


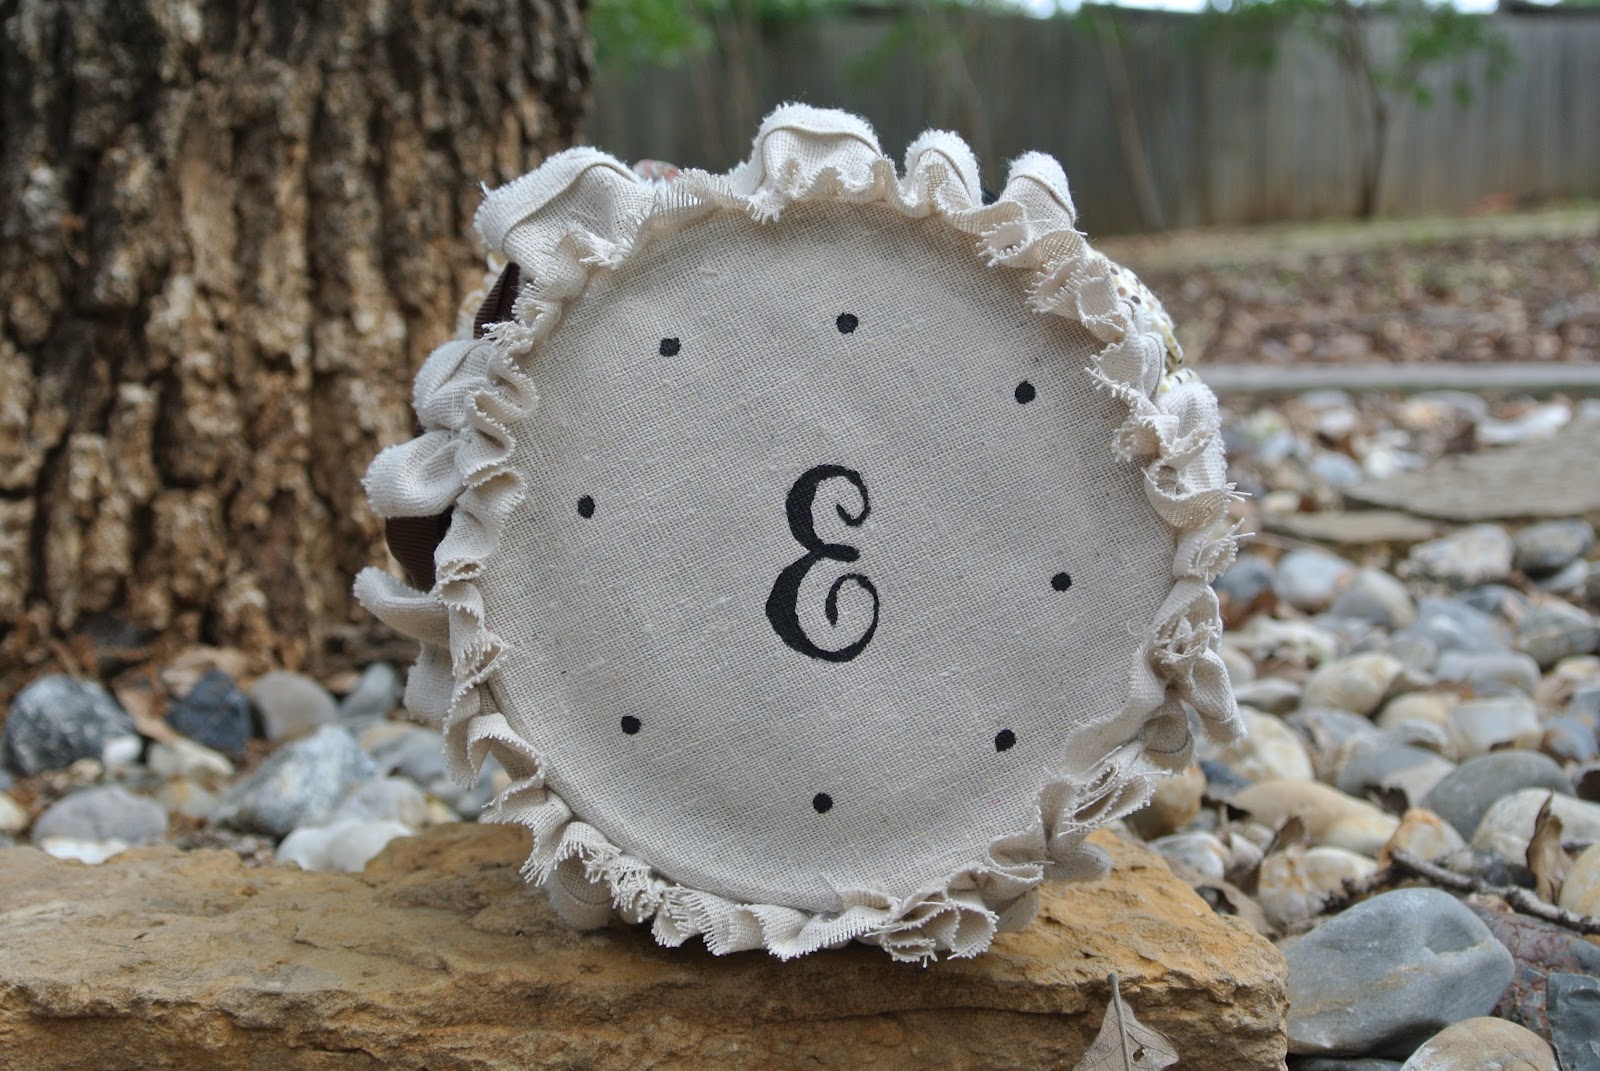
Now you can hot glue a little cotton batting to the body of the can and cover with fabric. (muslin was used here - SHOCKING! I know!)  then cover the raw edges with  ribbon.  Next head on over to the sewing machine and make a quick strip ruffle.  All you have left now is to cover the lid with the monogrammed piece of fabric,  glue the lid to the can, then glue the ruffle around the edge.  And there it is...a headband holder.


It can also stand upright if you prefer, but I found that the headbands keep it from rolling when it is placed on its side.  One note if your can has a metal ring on the bottom you may want to apply a clear coat of polyurethane or my favorite go to "glue all, cover all, protect all, fix all" Glossy Accents  around the bottom so that if it gets wet  - no rust on your bathroom counter.

I have one more headband holder idea floating around in my head, but for now I would love to know how you store headbands around your house.

Have a great Day!
jamie

FYI - find this project and over 300 more at the 36th Avenue and Crafty Scrappy Happy Me  linky party!

 The 36th AVENUE  Photobucket

Saturday, May 12, 2012

Lovable Links Edition 4

Good morning everyone!  Today's post makes me twice as happy as any other post.  It combines two of my favorite things...1) learning how to do something new  2) learning how to do something new for FREE!  Whoopie!  I love the look of watermarks that other bloggers use on their photos.  I thought that the photo editing software that came with my new camera would include that feature, but unfortunately it did not.  I was actually planning on running out to buy photoshop this week to work on some of Josh's graduation photos.  And then (drum roll please) I came across this post from My 1929 Charmer .  And voila.


Why didn't I know about this before I did Joshie's invitations?


I just selected a random photo from a previous post and added the blog name.


It took me about 90 seconds to add text to these three photos.  Super quick, super easy, super FREE!

Be sure to check out PicMonkey .

That's all for now, I'm off to learn about adding frames and other features to my photos!  If you try it be sure to let me know what you think!

j


Wednesday, May 9, 2012

More Muslin!

Hello everyone!  I hope you are having a great week.  I'm back to share another sewing project with that seemingly endless supply of muslin hanging around my work room.  Today I am showing a slipcover I made for the ottoman in my bedroom. 

 (that's my lovely assistant Joe)

It is just basic box construction on the top.  I placed the muslin on the ottoman and pinned the corners.  Just simple straight sewing after that.   I was thrilled to have enough of the little fringe edge to use on the ruffle!  Simple, inexpensive and washable, yea!

This was my first slipcover and although it took me the better part of a day I was pleased with how it turned out!

Have you every sewn a slip cover?  I would love to hear about it!

toodles, j

Sunday, May 6, 2012

Lovable Links Edition 3

Hey Everyone!  Just a quick post you send you in the direction of a really great linky party.  Aimee at It's Overflowing has about a million great ideas linked up on this page.  My muslin bee card is one of them.  Check it out if you get a chance!


Until next time,
jamie

Saturday, May 5, 2012

The story of a girl and 19 yards of muslin

Quick clarification before I begin... it is MUSLIN: a plain-woven sheer to coarse cotton fabric as opposed to MUSLIM: an adherent of Islam.  Bo was really confused for awhile as I danced around the house singing the praises of my latest new love.  He was relieved to know that I had not converted to a new religion but just slipped into another crafty obsession.  

Yes, I am the girl and the muslin started out as an in expensive way to make some cute blinds for my new studio .  The more I worked with it, the more inspired I became to create with it.  I love the slight variation of color, the texture and the light weight makes is a dream to use in projects.  So today will begin a series of  muslin sewing and craft projects.

Recently a friend and fellow teacher surprised me with this wonderful hand hooked mat.  I don't know if I have ever owned such a lovely piece of art, and I was overwhelmed by the fact that she took time to make it just for me.

Wool stitches and More : take a minute to visit her blog if you get a chance.

With a gift this special, no ordinary thank you card would do the job.   So I unfolded the bolt of muslin and started stamping.  I found the muslin super easy to stamp on,  I  used timber brown Staz-on ink so that I wouldn't have to worry about bleeding.  It is kind of difficult to tell in the photo, but between the layers of paper and fabric, I placed a little piece of batting to puff the heart up and give some extra dimension to the card. 


The little eyelash looking trim around the heart was actually a "whoops!". I had some adhesive showing through the heart cut out at the top, so i picked up some of the little trimming scraps from cutting the fabric and added them to the edges. It is one of my favorite parts of the card now. 


I tried to keep the inside simple. I ran a tan piece of cardstock though my Big Shot in a texture plate, dry brushed some ink over the it, and used the heart cut out from the front for my sentiment.


Check back soon for more muslin madness!
Toodles,
jamie